Sunday, December 20, 2009

Egg Ornaments

You want a fun, creative activity to do when you're snowed in? These little egg ornaments are sure to challenge your creativity and leave you with something you and your family will treasure for many Christmas' to come.

I make them every two or three years. Each time I make them they vary, depending on what I'm "into" that year.


My daughter Jossie wanted to make these with me this year. They were more challenging than she had realized. Not that it's such a difficult craft, but it does take a steady, gentle hand and a bit of patience. It's a very sticky craft. But the results are wonderful, and surprisingly durable! The paper and cloth glued inside and out makes them quite sturdy.

After spending the whole evening together, Jossie and I each had five of these cute ornaments. Each one was distinctively our own.


Before beginning, assemble the following:
Large eggs
Small sharp scissors for cutting the egg shell (Embroidery, cuticle or Scherenschnitte scissors work best.)
Something to put the eggs in or hang them on as you're making them
Disposable paint brush for applying glue

White glue, decopage medium or acrylic medium
String or wire for the hanger
Wrapping paper, old calendars or cloth scraps (If you have some with small designs which can be cut out, that would be perfect; especially if you don't have the little ornaments)
Cotton balls or bits of batting
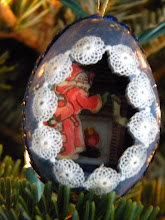
Ephemera: small ornaments, charms, or other small items for making a scene inside the egg. (I try to have tiny ornaments or little trees on hand for these. The ornaments and charms are perfect size for decorating the inside these cuties. If you don't have those on hand because you really are snowed in today, then wrapping paper or calenders with small designs will be a great stand-in.)

Using the scissors, gently tap on the egg to make a tiny hole in the top of it for putting the string through later.
Next, make a hole on the front of the egg just big enough to insert the tip of the scissors.

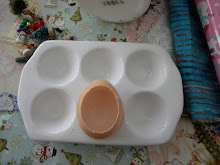
Carefully cut an oval out of the front, beginning at the little puncture and working in a spiral, until you get the opening to the size you want. Empty the contents of the egg into a container to use later, if you'd like.
Rinse the egg shell out carefully. It's extremely fragile around the opening, so you have to be careful not to crush it. You'll be covering the edges up later.

Put your hanger (string or wire) through the top of the egg. Spread out the ends inside the egg and glue.

Tear the paper (or cut cloth) into small 1" strips. Coat the outside of the egg shell, a little bit at a time, with glue and apply paper or cloth. Fold the ends over the edges of the egg (from outside to inside). Then do the same inside the egg shell.

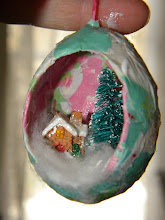
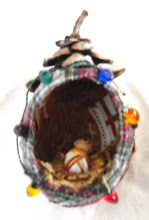
Glue some "snow" batting inside the shell. Add ephemera. Glue trim around the opening. Voila!

Some hints:
I have used bark, leaves, rose petals and pinecones as covering for the outside of the egg shell. The pink egg is covered with some paper which covered some floral soap.
If you don't have the tiny ornaments, you can use wrapping paper with tiny tree or Santa designs: Glue the paper to a piece of cardstock or other heavy paper and allow to dry. Cut it out and attach it to the inside of the egg.
  
You can keep it simple or make it as fancy as you'd like. You're making a treasure. No rules but one. Enjoy yourself!

Thursday, October 8, 2009

Billy's Submarine

The piece of artwork I used as inspirtation for this blog, "Billy's Submarine" (above), placed third in the Full Circle Fall Art Competition this week. I'm so pleased, as it is unusual for such whimsical mixed media pieces get recognition in art competitions. This little artwork was inspired by my husband, Bill, who as a childhood genius, actually created a tarpaper submarine which had a bilge pump used to make it "sink". Unfortunately, he couldn't raise it from its watery grave...even so, it makes a wonderful Daddy/Granddaddy story, and a great inspiration for my artwork. I will have to tell you about it another time, because the Full Circle art event starts in 25 minutes, it takes 5 minutes to get downtown from my house, and I don't want to be late. I'm excited. I LOVE being an artist! Later, my friend.

Thursday, October 1, 2009

Needle Felting


I am what every art store owner dreams about. I'm what every artist's husband hopes his wife won't become when she buys that first little set of oil paints, complete with canvas paper, turpentine and brushes. I am an addict. An art supplies addict.


How about you?

Actor Greg Kinnear has a line in one of his movies that goes like this: "I just...can't...help myself." I can't remember which movie it's from. But it is stated clearly, with a mischievous glint of delight in Greg's eye. It's one of those movie lines that gets stuck in your head, like Cary Grant's "Judy, Judy, Judy" or James Cagney's "You dirty rat!"...or "Cones! They're just cones!" (From the movie "Wedding Singer").

When it comes to art supplies, I find myself saying that line. "I just...can't...help myself." Now, understand, my friend, that I have been on a self-imposed art supplies buying restriction for several months now, but it seems like forever to me. That's because being a mixed media artist, not buying art supplies is a sacrificial act for me, sorta like fasting. As those of you know who have tried it, fasting is hard when you're hungry and your house is full of wonderful cookbooks filled with recipes you've been meaning to try. Likewise, refraining from buying art supplies is difficult when I come across a book filled with new art forms and creative venues.

So. A couple of days ago, I stumbled across a book in the fabric store on needle felting. Yes, Needle Felting. Before you say that needle felting is a craft and not "art", let me say this. What this woman did with a little wool, a couple of flat, sharp needles and an assortment of ephemora (as they call "stuff, junk and broken jewelry" in the business) was art. Genuine "Art".

I had to try it.

Going on the internet, I discovered wool roving (loose, unspun wool) and ordered some. Then in AC Moore, I found a needle felting "beginner's kit" way back in the corner by the yarn, complete with two sharp little needles, a chunk of foam and instructions for making a strawberry applique' on felt backing.

I didn't "need" a new art medium. But I didn't spend much money, either. And I'm inspired. So far I have made my strawberry applique, 27 striped or polka-dotted beads that are firm enough to go "plunk" when they hit the floor, and a beaded flower applique. Next I'm going to make a case for my phone, and put all that stuff on it. It's going to be cute. Really.

I'm taking photos. Then I'm going to download them onto my Tarpaper Submarine how-to blog. And I am sure that as I work in the future on my mixed media projects, these new supplies and my newly acquired needle felting skills will come in handy.
Art is like climbing up a ladder. Each rung leads to the next, until you reach the top.
See ya'!
deber

Wednesday, September 2, 2009

Diving Into Creativity

Today this blog is just a bit of butterfly's breath of a page in the vast sea of internet. It is my hope that eventually this will become a world of exploration for you to enjoy and to share with others.

I'm not creating Tarpaper Submarine just for artists, though it's my hope that many artists will enjoy coming here. It is intended for anyone interested in making things; a voyage of discovery not only for artists wanting to learn about new techniques and materials or to find renewed inspiration , but also for those who have a desire to create but don't know where to begin. 

There will be a "just for kids" section so budding artists can come on to copy patterns for creative play or learn tips on drawing and painting.

It is my hope that this site will be a useful tool for home-school moms and classroom teachers, as well.

Below are some of the things I would like to feature in the future:

1.   Patterns for a variety of paper projects, such as jointed and unjointed paper dolls, the little submarine behind my blog title, space ships, cars and animals, too. Things that will be appealing to both boys and girls, kids and adults.
2.   How to make your own designs into rubber stamps. Friend, if you can draw a simple design, you can make it into a stamp that you can use in many ways.
3.   How to use watercolors, oil pastels, encaustics, oils and other traditional art supplies. These would be basic how-tos, but you will be able to ask questions and maybe even send in a photo of your work for constructive critique.
4.   How to paint and decorate and use photographs. Again, you can use these simple techniques in many ways.
5.   Basic hand sewing and embrodery techniques and materials. Embellish your clothing, dolls, linens...anything you'd like, with these techniques.
6.   How to make creatures from recycled socks and clothing. (Then embroider them with your new sewing and embroidery techniques.)
7.   Various printing methods that you can do without a press. Because I am self-taught, I have come up with some of my own methods for this which I developed using things I already had around the house.
8.   Drawing tips. Artists instinctively start with drawing!
9.   Making pop-up cards and other greeting cards, including free patterns.
10. Beaded and some metal jewelry basics.
11. Making mobiles from paper, clay or found objects.
12. How to combine nature with crafts for children.
13. Potting herbs, flowers and making a children's garden. I know this isn't an official "craft", but it is so much fun, and is a creative activity that they enjoy.
14. Simple book making basics.
15. A variety of easy clocks to make.
16. How to make paper jewelry, including pins and earrings.
17. Refitting old things for new use.
18. Making notecards and envelopes. Free patterns!
19. Making paper and marbeling paper.
20. Collages and collage supplies and techniques. (This isn't your mother's collage, unless she's an artist!)

Sign up for my posts and get ready to start making stuff and having fun. Even though some things may seem to be geared for certain age groups, most will be adaptable to all ages and skill levels. Over the years, I have applied many things I learned as a child into adult projects.

Visit http://deberklein.com/ to view my art and learn a little more about who I am.